On this post I will describe my experience step by step installing Atlassian Bamboo on Windows with SQL Server as database.
This installation was done following the official documentation: https://confluence.atlassian.com/bamboo/installing-bamboo-on-windows-289276813.html
Requirements
You can check the current Bamboo supported versions in the following Atlassian confluence page: https://confluence.atlassian.com/bamboo/supported-platforms-289276764.html
In this case we have a clean Windows Server 2012 Standard installation. Our first steps are the installation of the JDK and SQL Server.
Install Prerequisites
JDK
First of all we want to install Java. In this case Oracle JDK, you can find the latest version in: http://www.oracle.com/technetwork/java/javase/downloads/jdk8-downloads-2133151.html
The latest version at the moment of this write is JDK 8 update 101 (jdk-8u101-windows-x64.exe)
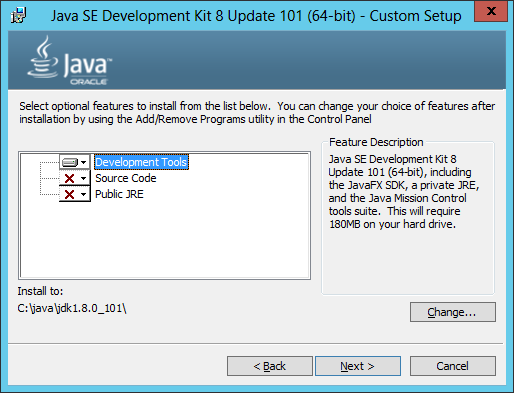
In this case we will only install the Development Tools and change the default installation directory to
C:\java\jdk1.8.0_101This is completely optional, mainly because I don’t like spaces in paths but you can leave the default configuration unchanged.
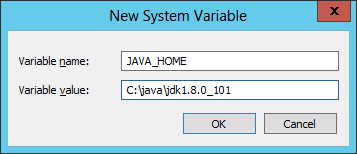
After you follow the wizard steps and finished the Java installation we just only need to define the JAVA_HOME environment variable
- Go to System (Windows+X and then Y in Windows 8+ or Windows Server 2012+)
- Advanced system settings
- Select Advanced tab
- Click on Environment Variables button
- Click on New button
We can test the Java configuration just by opening a console window and run:
echo %JAVA_HOME%
or:
%JAVA_HOME%\bin\java -version
java version "1.8.0_101"
Java(TM) SE Runtime Environment (build 1.8.0_101-b13)
Java HotSpot(TM) 64-Bit Server VM (build 25.101-b13, mixed mode)
SQL Server
We choose to use SQL Server 2014 as data store. Bamboo is nos restricted to SQL Server we can use any other supported provider like Postgre, MySQL or even the default HSQL database (not recommended for production environments)
Install
Download SQL Server 2014 Express from the official site
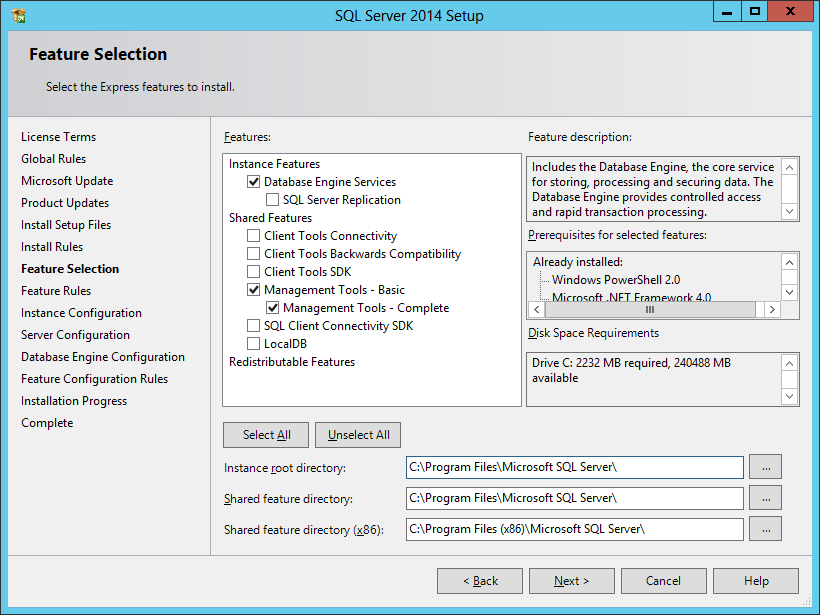
We want to install SQL Server Management Studio alongside with the database engine so we choose the Express and Tools installer option.
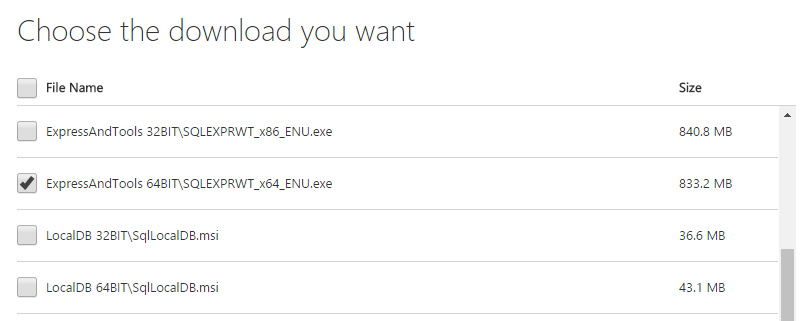
But you can install just the DB Engine. In fact that should be the default option when you install it in a dedicated server. Here for simplicity we are installing the DB and Bamboo in the same server.
Note: If you (like me) receive a “Microsoft .NET Framework 3.5 Service Pack 1 is required” error message (remember that we are installing Bamboo in a fresh installation of Windows Server) You will have to pause the installation process and go to:
- Server management
- Add Roles and Features
- Features
- .NET Framework 3.5 Features
- Install
After a moment the installatation of .NET 3.5 will finish and you can click on re-run the SQL Server installer analysis to continue with the SQL Server installation process
Configure
You can configure the server with the default user or Windows Authentication. In this case we will create a specific bamboobduser
- Security
- New Login
- of type SQL Server Authentication
Next we have to create a database for Bamboo. Remember to Configure the database with a case-sensitive collation (e.g. Latin1_General_CS_AS)
You can configure the collation from the New Database dialog:
- Options
- Collation
- By default is
<default>(in my caseSQL_Latin1_General_CP1_CI_AS) you can change it toLatin1_General_CS_ASfor example
Configure bamboobduser as bamboo db_owner, go to:
- Security
- Logins
- Properties of the user
- User Mapping
Last we have to configure the database to use the correct isolation level by running the following SQL script:
ALTER DATABASE <database name> SET READ_COMMITTED_SNAPSHOT ON WITH ROLLBACK IMMEDIATE;
To verify the changes you can run the following query:
SELECT sd.is_read_committed_snapshot_on FROM sys.databases AS sd WHERE sd.[name] = '<database name>';
It should return a single record is_read_committed_snapshot_on with value 1
The reason for this last chage is because JDBC is generally simpler and the recommended method to configure Bamboo with SQL Server
Bamboo Install
First we have to download Bamboo https://www.atlassian.com/software/bamboo/download
The latest version at the moment of this write is: 5.12.3.1 build 51215 - 04 Jul 16
The installation process is very straighforward. Just follow the wizard steps. There is only two concepts that we can pay attention and define if we will use the default options or change them: installation and home directory
Installation directory: This is the directory where Bamboo’s application files will be installed. The default is: C:\Program Files\Bamboo
We changed it to: C:\atlassian\bamboo\base
Bamboo home directory: This is the directory where Bamboo will store its configuration data. The default is: C:\Users\<current-user>\bamboo-home
In our case and following the previous path: C:\atlassian\bamboo\home
It could be configured with any path. Just remember to avoid include the home in the same path as the installation directory
Run Bamboo as a service
You have to open a console window as an Administrator and run [bamboo-install-dir]\bin\service.bat
In our case:
C:\atlassian\bamboo\base\bin\service.bat
Installing the service 'Bamboo' ...
Using CATALINA_HOME:    "C:\atlassian\bamboo\base"
Using CATALINA_BASE:    "C:\atlassian\bamboo\base"
Using JAVA_HOME:        "C:\java\jdk1.8.0_101"
Using JRE_HOME:         "C:\java\jdk1.8.0_101\jre"
Using JVM:              "C:\java\jdk1.8.0_101\jre\bin\server\jvm.dll"
The service 'Bamboo' has been installed.
- Run services.msc
- Configure “Atlassian Bamboo Bamboo” startup type to Automatic and Start the service
We are using the default user. You can create and configure the service with a specific (restricted) bamboo user
Now you should be able to navigate to http://localhost:8085
Bamboo default port is 8085. To change it you can edit the administration.xml file in bamboo home directory:
$BAMBOO_HOME/xml-data/configuration/administration.xml.
C:\atlassian\bamboo\home\xml-data\configuration\administration.xml in our case.
<myBaseUrl>http://[host-ip]:[port]</myBaseUrl>Also you will have to change:
$BAMBOO_INSTALL/conf/server.xml.
C:\atlassian\bamboo\base\conf\server.xml in our case
  <Service name="Catalina">
  <Connector
      protocol="HTTP/1.1"
      port="[port]"
      ...
Firewall
Enable TCP port 8085
You can configure it through Control Panel > Windows Firewall with Advanced Security
Or opening a console as and administrator and run:
netsh advfirewall firewall add rule name="bamboo" dir=in action=allow protocol=TCP localport=8085
Bamboo Configuration
License
When you navigate to http://localhost:8085 as a first step you have to enter your license: you can request a 180 days evaluation license
Also you have the option to make an Express Installation or Custom Installation. We take the custom path.
Paths
Next you can define system path directories like Configuration, build data, working and artifacts directory. For example you can configure build working (source code checkout directories) or artifacts directory to a different hard disk, etc In most cases default options here are just fine.
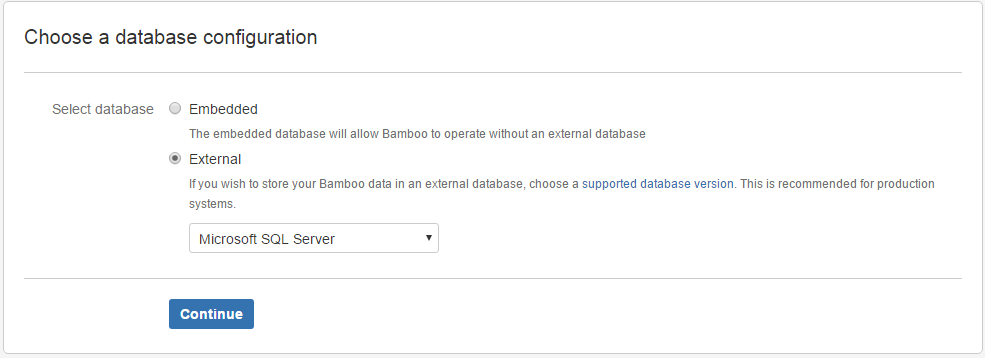
Database configuration
Choose database configuration. In this step we want to configure our SQL Server database.
Select External and from the combobox Microsoft SQL Server:
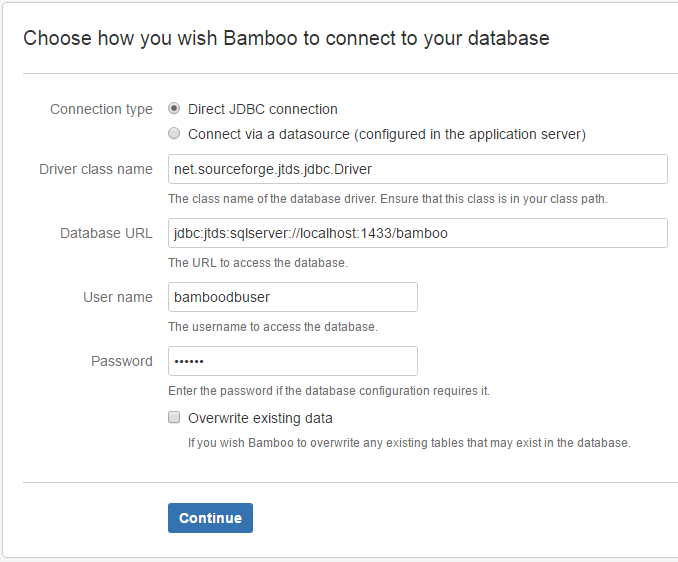
Database connection configuration
On the next step we have to configure the database connection parameters:
- Connection type: Direct JDBC connection
- Driver class name: net.sourceforge.jtds.jdbc.Driver
- Database URL: jdbc:jtds:sqlserver://localhost:1433/bamboo
if you have the database in another server here you have to configure it jdbc:jtds:sqlserver://[host-ip]:[port]/[database-name]
- User name: bamboodbuser
- Password:
Finalising
Click continue and Bamboo will take a moment to create all the tables and initialize the database.
In the next step we select to Create a new Bamboo home
Setup an administrator user and that’s it we should be ready to implement continuous integration/continuous delivery with Bamboo.
Next steps
In future posts we can see how to configure build agents and create continuous integrations and deployment plans.
Update: SMTP configuration
Useful to get build status notifications. In my case I have created and configured an outlook account and configured it in Bamboo.
Go to Communication > Mail server
Basically the required configuration is:
| Key | Value |
|---|---|
| From address | [no-reply-account]@outlook.com |
| Email settings | SMTP |
| SMTP server | smtp-mail.outlook.com |
| SMTP port | 587 |
| Username | [no-reply-account]@outlook.com |
| Use TLS | True |
